So I go on a trip overseas only to come back to find out one of my workers apparently scratched $30,000.00 worth of Old Castle’s finest. These scratches have no rhyme or reason to them. Just a whole lot of scratched glass. Some of it deep enough to catch a finger nail in. Do the scratch removal systems get the deep scratches? Also the construction company is concerned about there being distortions in the glasses appearance when looking through it since a layer of glass is missing. Also have any of you dealt with a insurance being denied due to Care/Custody and Control Issues?
Wow! I have heard this story quite a few times now, and YES the GlassRenu System can get out the deepest of damage. We are removing minimal layers of glass and with the GlassRenu System, you will be able to achieve distortion free results guaranteed! I hoped this helped you out, please let me know if you have any further questions. Check out GlassRenu and friend us, in a matter of hours you will see a video focusing on DEEP, EXTREME concrete damage from glass.
Cheers,
Cole
Oh man Doug. I feel for you. Was all the glass hit with a razor? Was it a new construction?
Check out the Restoration Revolution series. You can see what the Glass Renu system can do first hand. Both Cole and I can answer any questions about the system for you.
Best of luck
Rough Guess guys: Each pane 4’6" x 9’. How long per pane to restore? Each pane is hit with scratches.
since no replies yet, I’ll respond, I was told 5-7sft an hour for a newbie with typical scratches. which comes out to 6.5 - 8.5 hours per pane of that size.
Ouch.
Wonder what the max sft is after the learning curve is over?
Good guess, but without seeing the severity of the damage it is hard to say. The reality is that even if most of the damage is extreme, and you need to resurface the whole pane there is a different strategy than if you are removing a single scratch. I would say for a first job (no experience at all) your estimate is close, maybe a bit long. If I had someone on the pane with 12-15 repairs under their belt the time would be cut in half, and once you have several hundred repairs it would most likely take 2-2.5 hours per pane. The learning curve is going to depend on how much grinder time your techs are getting, if they are comfortable with power tools and if they can stay focused on the repair. This isn’t magic, but just as a new window cleaner needs to learn how to fan, when to recognize that it is time for new rubber, how to properly remove screens etc… there are subtle skills that build with restoration as well. Most people can move quickly along the learning curve, but rather than be the one to say one way or another I would love to hear what our users on this forum think.
So far the only paying gigs I’ve had have required a complete resurfacing.(sometimes both sides, another challenge) Well it is not a walk in the park being that I’m still considered a novice. I would love to see a video demo on how to approach this kind of repair. What I want to see is where there is scartches all over, some light and some heavy and scattered throughout.
it is hard to approach resurfacing when you’ve been trying to wrap your head around grinding down a damage spot and expanding the repair out to eliminate distortion. When you have a deep scratch in the centre then some light scratches around that and then more deep scratches out near the outer edge, how do you expand the repair area to eliminate distortion?
Wow that is alot of time per pane! That is very helpful in my decision to replace or repair. There are time constraints that would not allow that kind of time to buff out those scratches. I contacted Fields Construction and my attorney to start the process of finding out if it’s bad glass after it is removed. Thanks for your help on this everyone.
So Doug
what did the employee say?
Did you have a waiver in place Doug?
We will shoot this video this week. You are right, when resurfacing glass you want to take a different approach than when you are removing a single scratch. We have a piece of glass that we will resurface and talk through this type of repair.
Awesome! I might have another one of theses to do in June sometime.
Ahh i would love to see a video covering this as i have a huge job requiring this once i get my unit this week!!
Well Cody while we’re talking about different videos on resurfacing a whole piece of glass, any hot tips/videos/etc before I get my unit this week on this bad boy?
TDS is 350 where I’m at, plenty of stuff like this all around town.
unfortunately, replacement cost is only $8.60 a sft, go figure.
This may end up being just a case of being able to gain a sufficient mastery pro bono before replacement.

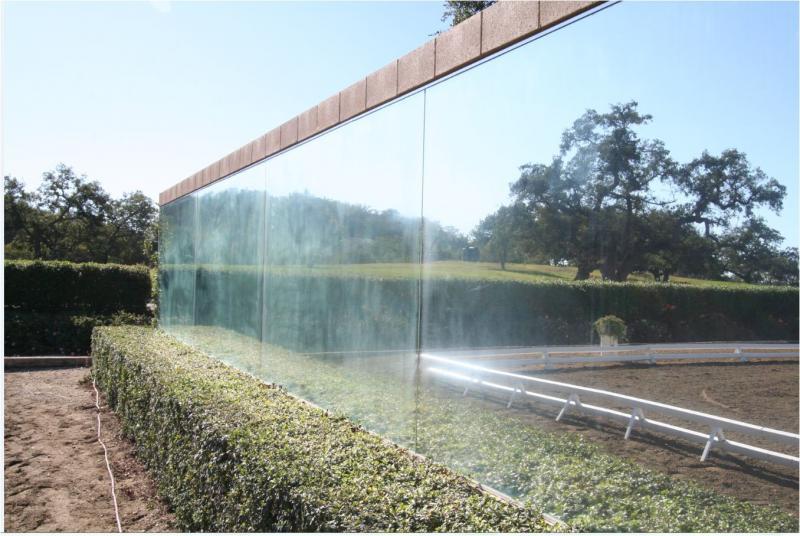
Bruce-
Love the photos!
Ok, so first things to notice. 1) These mirrors look to be flush mounted to a brick wall. This is important as the glass will dissipate heat slower than a window (as window panes usually have both sides exposed to ambient air) so when working on the glass you want to be very diligent about monitoring the temp. 2) The damage looks worse than it is. It is very likely that you will be able to remove most if not all of this damage with polish alone. For that reason when you arrive at the job site start out with your 6" polishing felt, rough it up real well with the rasp file, and then make sure that you get the pad nice and damp with polish. Work in a small test area (be sure to start where the mirrors look the worst) and see how long a 1 X 1 sq foot are takes to clear up. This will serve as a guide for the rest of the repair. If the glass isn’t clearing up within the first 5-10 min, you will want to jump to a more aggressive disk. I would try the pre-polish disk first, but if that wasn’t aggressive enough I would jump to the Black (mid grade) disk. Now the great thing about these mirrors is that they are butt mounted so there isn’t any frame-work that you need to worry about. Take your time, but MAKE SURE you grind in a consistent pattern and at a consistent speed. Resurface the damaged area until the mirror has a uniform haze. As soon as the glass looks uniformly hazy jump to the pre-polish and then polish.
This is a big job, and unfortunately mirrors are cheap to replace so assuming these mirrors are 8 feet tall and 80 feet long (counted 10 fence lengths) you are looking at a replacement cost of ~$5500.00 This job I would quote out at $2500-$3200 which is higher than the 30% I normally shoot for, but looking at worst case it would take me 32 hours to grind / Pre-polish and polish these panes. Best case it would take me 16-18 hours just to polish out the damage in which case I would shoot for the lower end of that price.
Now, a couple of notes on this job and mirrors in general. If this is your first job it will take longer for you to do. Mirrors are tricky in this type of application because they are meant to view reflections at a distance (judges and spectators) which means that if you don’t do a uniform repair it will be evident. Also as I mentioned before because they are flush mounted against brick they will retain heat a little longer than other windows. I am not saying this to discourage you at all as this job is doable and can be very profitable. Also this is they type of job that will give you all the Before/After pics you will need for marketing the service. Please make sure our number (888-769-0001) is in your cell phone and please call in if you have ANY QUESTIONS when doing the job.
This is awesome! I can’t wait to see the after photo’s.
Also for those who asked to see a video of resurfacing here is a video we shot last week, it is a bit long, but if you watch me remove the damage you will see what I mean by consistent speed and movement. Enjoy
Thanks for the detailed response Cody.
Awesome video, what a system you’ve developed!
thanks for the video…im very anxious to get mine this week!
